---
title: Managing leads and queues
description: Lead Queues & Management
---
[Skip to content](https://support.sellfire.com/rep-lead-queues-management#main-content)
[](https://sellfire.com)
Open main navigation
Close main navigation
Search the Knowledge Base
- There are no suggestions because the search field is empty.
1. [Sellfire Help Center](https://support.sellfire.com/?hsLang=en)
2. [Rep Guide](https://support.sellfire.com/rep-guide?hsLang=en)
# Managing leads and queues
Your leads and all information associated with those leads are organized in sections in the left pane of the *Dialer*, in your *My Leads* section, and in your *Performance Dashboard*. These work together to ensure your leads are easily accessible at the right times and when you want to see them so that you can work through them in the most-efficient and effective way possible through the Sellfire *Dialer*.
The [Call Results](https://support.sellfire.com/rep-call-results-scheduling-events?hsLang=en) that you select determine how your leads are automatically cycled and presented to you at the right times, so to maximize the organizational and efficiency gains of Sellfire automated lead cycling, it is important that you select accurate call results.
### Lead Card
The *Lead Card*, which is found in multiple sections in the *Dialer* and many other sections of Sellfire, houses all important lead information and history in a compact and easily-accessible format that allows you to quickly attain the information you need to confidently and efficiently contact prospects.
#### **Expanded view**
The expanded view of the *Lead Card*, which populates automatically when you have selected the lead in the *Dialer \> Queue *section, the current call screen, *Call Reports*, *Event Detail* pages and *Lead Detail* pages, has four sections:
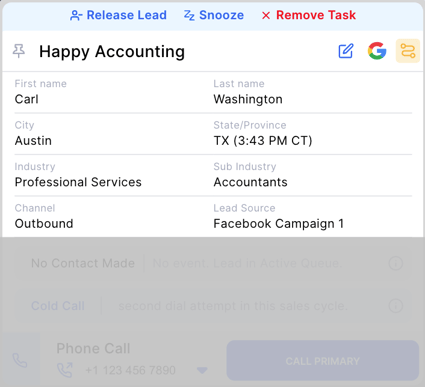
#### Key info
|  |
| --- |
| 1) **Release Lead** (removes lead ownership) or **Snooze task** (retains lead ownership). \[Only available in the Queue section\] 2\) **Remove Sequence Task**. Remove this *Sequence* task and move the lead to the next *Sequence* task. \[Only available in the *Next Action* section\] \[Only available if turned on by an Enablement user in *Sequences \> Settings*\] 3) **Pin a Lead.** Click to keep the lead visible in your *Pinned* queue. 4\) **Access the *Lead Detail* page**. Click on the business name to open a new tab with additional lead details. 5\) **Edit key lead info.** 6\) **Search Google for the lead**. Open a new tab with the business name or contact name and the city & state automatically populated in the search bar. 7\) **Sequence task indicator**. If visible, this task is populating based on a custom *Sequence* that your organization has configured. 8\) **View key lead info**.\* |
\* Enablement users can configure which fields appear at the top of the *Lead Card* in the key info section by navigating to *System Configuration \> Lead Management \> Customize Lead Card*.
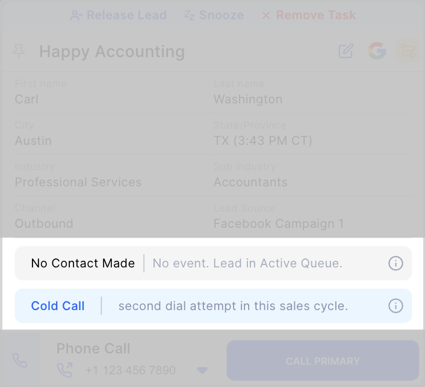
#### Current sales cycle context
|  |
| --- |
| 1) **Pipeline Stage**, future event date/time, date/time the lead will reappear in the *Suggested Queue*. 2\) **Type of call** and **number of dial attempts** in the current sales cycle. |
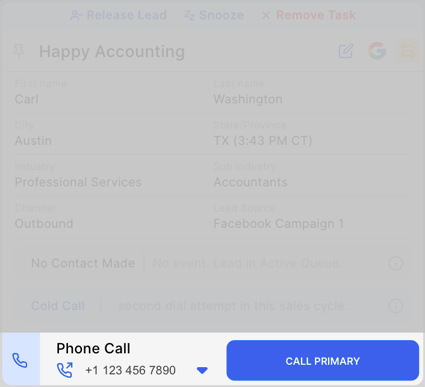
#### Call to action
|  |
| --- |
| 1) **Task type**. Phone call, Email, SMS, custom task. 2\) **Will Dial As**. Select from which number you will dial the prospect; either your personal Sellfire number or the Local Presence number associated with the area code of the *Primary Phone Number*. \[Only available in the *Next Action* section\] \[Only available if Local Presence numbers have been applied to your organization. Enablement users can contact our Support team (support@sellfire.com) to turn these on for your organization\] 3\) **Task Note**. If the task is triggered by a custom *Sequence* configured by your organization, this is the note that an Enablement user configured as part of that *Sequence* task. 4\) **Call to action**. This will prompt Reps to take the action that is called for as part of custom or default *Sequences*. 5\) **Undo Make Next Action**. If the task was manually added by a Rep to the *Next Action* section by clicking the *Make Next Action* button on the *Lead Card*, that action can be undone. \[Only available in the *Next Action* section\] |
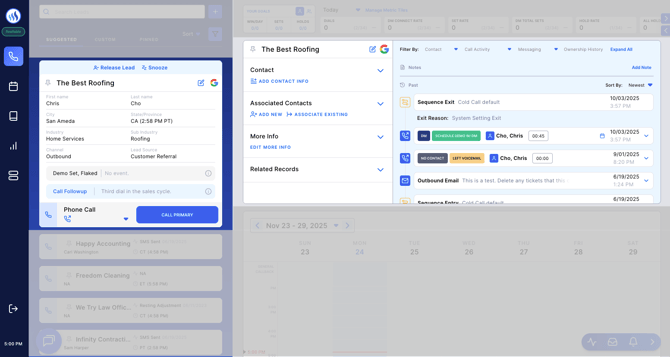
#### Contact info, additional lead info, & history
Populates to the right of the *Lead Card* in the *Dialer*, current call, and *Lead Detail* sections.
|  |
| --- |
| 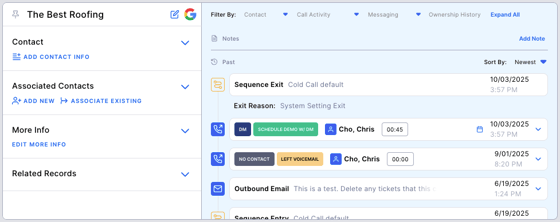 |
| 1) **Contact** drawer. All phone numbers and email addresses attached to the lead, including those from any Associated Contacts. 2\) **Associated Contacts** drawer. Any separate contacts that are associated with this same lead. 3\) **More info** drawer. Any additional fields and data that are not already populated in the top key info section. 4\) **Related Records** drawer. Any additional objects/data attached to the lead; associated with custom objects and third party system integrations. 5\) **Call Notes & History** section. To the right, all previous call notes and lead activity history, including all phone calls, recordings, email, and SMS activities associated with the lead. Filter by specific activity types and expand or collapse all. |
#### **Collapsed view**
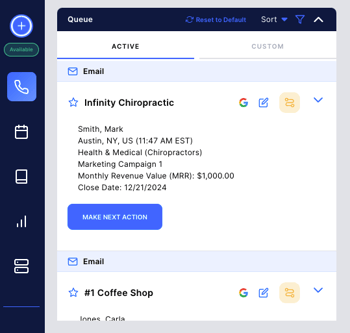
The collapsed view of the *Lead Card* (shown below), which populates in the *Dialer \> Suggested Action*, *Dialer \> Queue*, and *Dialer \> Favorite Leads* sections, allows for quick access to the information in the top section of the expanded *Lead Card* and easy navigation between leads while they are in task views. The *Make Next Action* button is available in this view so that leads can be quickly moved to the *Dialer \> Next Action* section.
The collapsed view can be expanded by clicking on the carrot at the top right of the card, which allows Reps to take action, including dials, emails, and SMS, on leads directly in those sections of the *Dialer*.

#### **Configure fields in the key info section**
Enablement users can configure which fields appear at the top of the *Lead Card* in the key info section by navigating to *System Configuration \> Lead Management \> Customize Lead Card* (shown below).

Select up to twelve system or custom fields from your lead object, and drag them in the order that you would like them to appear on the *Lead Card*. You will see a preview of what the *Lead Card* will look like on the right side of the screen. Click *SAVE CHANGES* at the top right of the screen when you're ready to apply your changes.
### Suggested Action
By default, the Sellfire* Suggested Actions* that are presented at the top of your *Dialer* queues are ranked by pipeline stage so that you are prompted to take actions on the leads that have the highest probability to close first. Your *Suggested Queue* mirrors this ranking by default, so if no custom sorts or filters are added to the *Suggested Queue*, it will include a list of leads and tasks in the order that they will appear in the Sellfire* Suggested Action* section.
#### **Default ranking hierarchy**
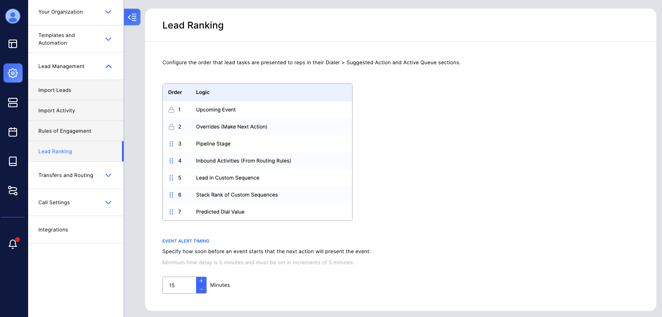
1. 1. Upcoming Event
2. Rep clicked "Make Next Action" on the Lead Card
3. Pipeline stage
- Decision Call Held
- Follow Up Demo Held
- Demo Held
- Demo Set
- Demo Set Flaked
- DM Contact Interested
- DM Contact
- NDM Contact Interested
- NDM Contact
- No Contact
- Undialed
4. Inbound activities (from Routing Rules)
5. In a custom *Sequence*
- Yes
- No
6. Stack rank of custom *Sequences* in the Enablement *Sequences* section
7. Predicted Dial Value (Sellfire native lead ranking)
#### **Configure Ranking hierarchy**
Enablement users can navigate to *System Configuration \> Lead Management \> Lead Ranking* to change the order of numbers 3-7 listed in the *Default ranking hierarchy* section above. This configuration applies to how all Reps' leads in the organization are ranked in their *Dialer \> Sellfire Suggested Action* and *Active Queue* sections.
#### *Common use case*
If you would like to optimize Reps' speed to contacting inbound leads that are assigned to them from [*Routing Rules*](https://support.sellfire.com/enablement-system-configuration-transfers-and-routing-routing-rules?hsLang=en) regardless of where the leads currently are in the pipeline stages (*for example, prioritize inbound leads that are in the "No contact" pipeline stage over outbound leads that are in later pipeline stages),* move the "Inbound activities (from Routing Rules)" option to the third rank (above "Pipeline Stage"). This will rank all tasks for leads that were assigned to Reps from your configured inbound *Routing Rules* above all other outbound leads regardless of pipeline stage; ensuring that they are prompted to take actions on the inbound leads as soon as possible.
### Your Next Action
The *Next Action* section is automatically populated with the lead that is at the top of your *Suggested* or *Custom Queue* (whichever queue you currently have selected), but you can make any lead that is assigned to or owned by you your next action by clicking the *Make Next Action* button anywhere that you have access to the *Lead Card*.
When either queue is selected, the lead at the top of the queue will populate in the *Next Action* section after confirming the previous lead's call result in the order that they appear in the Queue from top to bottom.
In this section, the *Lead Card* is automatically expanded so that you can easily see the most-important information and history attached to the lead and quickly take actions on the lead (call, email, SMS, skip, release).
#### Upcoming events
If it is within 15 minutes\* of a scheduled event like a specific time callback, a demo, or a decision call, the lead to which that event is assigned will populate in the *Next Action* section. While that lead is in the *Next Action* section , no other leads can be moved there (until it is called within an hour prior to the event or the event time has passed), but you can take actions on other leads by expanding the *Lead Cards* for those leads in the *Queue*, *Recent Dials*, the search feature at the top of the *Dialer*, clicking into the *Event Detail* page or by opening the *Lead Detail* page by clicking on the business name of the lead in the *System View \> My Leads* section or through the drill down table in the *Coaching View* of your *Performance Dashboard* (graph icon in the left navigation bar).
\* The default amount of time that a lead is in the *Next Action* section before a specific-time event is 15 minutes, but an Enablement user can change that for your entire organization by navigating to *System Configuration \> Lead Management \> Lead Ranking*.
### Lead queues
On the left side of the *Dialer* underneath the *Next Action* section is the *Queue* (shown below). The purpose of the *Queue* is to order the tasks that are scheduled to appear in your *Next Action* section. The *Queue* is made up of three separate tabs: *Suggested*, *Custom, and Pinned*.
To refine your lead lists in the *Queue*, you can sort leads by
1\) Organization Order (this is the default sort as described in the *Suggested Action \> Default ranking hierarchy* section above),
*2) Predicted Dial Value* (Sellfire native lead-scoring)
3\) Most recently dialed
4\) Leads that have not been dialed in the longest amount of time
5\) Leads that were created most-recently
6\) Most Dialed (this cycle) - Leads with the most dial attempts in their current sales cycle, and
7\) Least Dialed (this cycle) - Leads with the fewest dial attempts in their current sales cycle first.
You can filter leads using a number of criteria, including Pipeline Stage, Time Zone, and Times Dialed (This Sales Cycle). The Times Dialed (This Sales Cycle) filter lets you select one or more dial-count buckets (0, 1, 2, 3, 4, 5+) scoped to each lead's current sales cycle.
#### **Suggested Queue**
In the *Suggested Queue*, Sellfire presents to you the tasks that are ready to complete in the order that your organization has configured (or that you have sorted/filtered), excluding upcoming events (these will appear in the *Next Action* section automatically at the time of those events), those in the “On-Deck” phase that do not have due actions, and those that are outside of prospects business hours\* (8am - 5pm).
Sellfire will automatically populate these tasks for you in the *Next Action* section in between the high-value scheduled time events like specific time callbacks, demos, and decision calls (that automatically appear in your *Next Action* section when their times approach), which means you do not have to worry about tracking leads without events because their tasks will automatically populate here and then subsequently in your *Next Action* section for you when they are ready to have action taken on them again. This affords you the ability to continuously use the *Next Action* section, which dramatically increases your efficiency, while not losing track of your high-value leads.
\* If Reps would like to override the time zone constraints that prevent leads from populating in the *Suggested Queue* outside of their business hours, they can add a filter to their queue and select any time zones that they would like to call. This will override these automatic time zone constraints and populate leads that are ready to be dialed again.
#### **Empty queue**
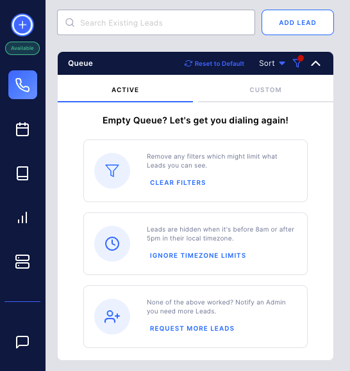
If Reps have no available tasks within prospects' general business hours (8am - 5pm their local time), they will be presented with the following options in their empty queue (shown below).
1. 1. Remove all applied filters that are hiding tasks.
2. Ignore 8am - 5pm time zone constraints to pull in tasks for these leads. Reps can also pull in leads only for specific time zones by adding filters only for those time zones.
3. Request more leads from Enablement users. This will send a notification to Enablement users that the Rep has requested more leads. Enablement users can then navigate to [*System Configuration \> Your Organization \> Sales Teams*](https://support.sellfire.com/enablement-system-configuration-your-organization-sales-teams?hsLang=en) and click "Refill Queue" on a Rep's card to give them the same types of leads that are included in their automated nightly assignment or navigate to *System View \> All Leads* and select specific leads to assign to the Rep.
#### **Custom Queue**
The *Custom Queue* is a list of any of a Rep’s assigned or owned leads in the order that the Rep has chosen by adding them through the *My Leads* feature. Any additional leads that Reps add from the *My Leads* section will be sent to the bottom of this queue in the order that they added them. Here, Reps can build lead lists in any order that they see fit based on criteria that they choose so that they can then take actions on those leads as efficiently as possible in the *Dialer*.
### My Leads
With the *My Leads* feature, you can view all of your currently assigned and owned leads in a table view, select and order columns of data in that view, apply filters to see leads based on specific criteria, unassign leads from yourself in bulk, and move leads to your *Custom Queue* to create custom lead lists that you can then leverage the efficiency of the *Dialer* to work through.
| | | |
| --- | --- | --- |
| 1a) Navigate to the *System View*. 1b) Click the *My Leads* tab. | 2) Manage which columns of data appear and their order. | 3) Apply filters based on numerous criteria. |
| 4) Unassign or move leads to your *Custom Queue* in bulk. | 5) Search your leads for specific names and numbers. | 6) Select / unselect all leads on the current table page. |
| 7) Sort the table by specific columns. | 8) Click the business name to access Lead Detail pages. | 9) Adjust how many leads populate per table page. |
### Lead pipeline management
While the *Suggested Queue* automatically populates leads to help progress them through your lead pipeline, Sellfire also provides a specific *Pipeline* view for you to see where all of your leads are currently in your pipeline so that you can easily identify and determine next steps to continue to progress leads towards a sale. The *Pipeline* view can be found by navigating to your *Performance Dashboard* via the graph icon in the left navigation bar and then clicking on the *Pipeline* dashboard tab. To see where all of your owned leads are currently in the pipeline regardless of projected future close dates, toggle "Ignore Close Dates" on in the upper left of the table.
Starting with when contact is made with a prospect in that specific sales cycle, each column indicates the farthest each lead has progressed in its current sales cycle. Where your leads are in sales phases and subsequently where they appear in the *Pipeline* view is directly impacted by the call results that you select for leads, so to ensure you remain organized, efficient, and aren't losing track of leads, it is important that you are selecting accurate call results for each call.
*For example, the Demo Set column houses all leads for which an Initial Demo or Rescheduled Demo (first demo of the current sales cycle) has been set for the future but not yet held. By clicking into this column and reviewing the drill-down table that populates as a result, you can ensure you are taking steps to hold demos with those prospects.*
### Claiming & self-sourcing leads
Click [here](https://support.sellfire.com/all-lead-assignment-claiming-ownership?hsLang=en) to reference the Lead Assignment, Claiming, & Ownership article.
### Duplicate lead management
Sellfire prevents duplicate leads by not allowing the same phone number to be used on multiple leads. At times, the same prospect may have multiple separate leads in Sellfire if they have multiple unique phone numbers. This can also occur if prospects call into Sellfire from phone numbers that are not already associated with leads in Sellfire. Because Sellfire is unable to associate that unknown phone number to an existing lead and to ensure the phone number from the incoming call is not lost, a new "blank" lead will be created with only the new phone number.
If this happens, leads can be combined in a couple of ways:
1. Using the *Associated Contacts* feature (details in the *Associated Contacts* section below) found in the *Lead Card* and *Lead Detail* page. This is the recommended approach because when leads are combined in this way, all lead history is collated in the single lead.
- Enablement users are also able to associate (merge) multiple leads at once through *System View \> All Leads*. Click the checkboxes next to the leads that you would like to merge, click *Bulk Actions \> Designate a Primary Contact*, select the primary lead from the dropdown that appears (with all of the currently-selected leads), and click *Continue*.
2. The phone number can be taken off of the duplicate lead by:
- Copying the phone number.
- Entering 1234567890 in its place (this phone number can be used unlimited times on leads).
- Pasting the phone number you want to keep as an alternate phone number or *Associated Contact* on the lead that you want to keep.
- Finding the duplicate lead by searching for *1234567890* in the search bar at the top of the Rep *Dialer*, expanding the *Lead Card*, clicking *Log Non-Call Activity* (shown below), and then selecting the *Duplicate Lead *result under the *DM* or *NDM* contact options*.
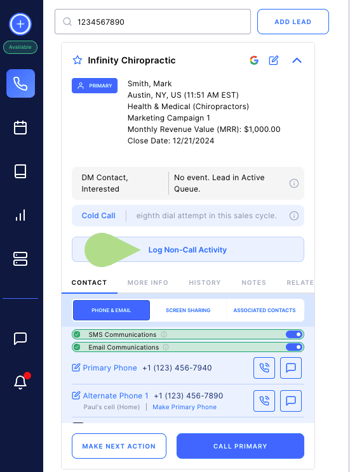*
### Associated Contacts
With the *Associated Contacts* feature, you have control over which specific contacts should be associated with a single lead. All system and custom fields available for the primary contact on a lead are separately available for the *Associated Contacts* to be updated for that unique contact, an *Associated Contact* can be made the primary contact, separate leads can be merged into leads as *Associated Contacts*, *Associated Contacts* can be broken out of their current leads into separate leads, and can be connected separately in the HubSpot and Salesforce integrations.
Rep, Manager, and Enablement users are able to manage *Associated Contacts* on individual leads. Enablement users can also merge leads in bulk through *System View \> All Leads*. If you would like to merge leads as part of a lead .csv import, please reach out to our Support team (support@sellfire.com), and we will guide you through that process.
#### **Functionality**
#### Lead Card & Lead Detail \[All user types\]
| **1) Create a new *Associated Contact* for an existing lead**: While in a *Lead Card* in the *Next Action* or *Lead Detail* sections, click *Add New*. Other than the primary phone number, the primary contact’s information will auto-populate when creating an *Associated Contact*. Any of these fields can be edited to reflect the *Associated Contacts*’ specific details. |
| --- |
| **2) Add another existing lead as an *Associated Contact***: While in the *Lead Card* in the *Next Action* or *Lead Detail* sections, click *Associate Existing*. A lead search modal will appear. Enablement users will always be able to search all leads in your lead pool here. If your organization has configured to allow managers and/or Reps to see all leads in your lead pool, they will also be able to search all leads in your lead pool here. If your organization does not allow managers and/or Reps to see all leads in your lead pool, they will only be able to search leads that are assigned to or owned by them. |
| **3) Edit *Associated Contacts*' system fields.** |
| **4) Make an Associated Contact a separate lead**: This will create a new lead with the *Associated Contact* as the new primary contact. |
| **5) Make an *Associated Contact* the primary contact**: This will make the *Associated Contact* the primary contact for the lead. The previous primary contact will be attached to the lead as an *Associated Contact*. |
| **6) Dial or text an *Associated Contact***. |
| **7) Add alternate phone numbers and email addresses to the *Associated Contact***. |
| **8) Filter the *Lead History* section in the *Lead Detail* page by specific contacts**. |
| **9) View *Associated Contact* creation and association history for the lead**. |
| **10) Add alternate phone numbers and email addresses to the primary contact.** |
#### [System View \> All Leads \[Enablement\]](https://support.sellfire.com/how-to-use-all-leads-in-sellfire?hsLang=en)
#### **Integrations**
#### [HubSpot](https://support.sellfire.com/enablement-system-configuration-integrations-hubspot?hsLang=en)
If the specific field mapping is configured for Sellfire to write to HubSpot (Sync Rule = “Two-way” or “Always use Sellfire”), Sellfire will push a lead update or creation to HubSpot based on activity in Sellfire. As part of that sync, a *Company* field mapping has been made available (you will need to activate this in your integration field mapping) to allow multiple contacts (primary and associated) on the same lead in Sellfire to be referenced in HubSpot under the same *Company* umbrella. The business name for the primary contact will be used in the *Company* field for all contacts on that lead.
*Associated Contacts* will have separate Contacts in HubSpot connected to Sellfire with separate HubSpot IDs.
#### [Salesforce](https://support.sellfire.com/enablement-system-configuration-integrations-salesforce?hsLang=en)
When a sale is made, Sellfire will create or update an Account and Opportunity in Salesforce and will then create contacts for the primary contact and all *Associated Contacts* using the primary phone numbers associated with each.
#### [.csv imports](https://support.sellfire.com/enablement-system-configuration-lead-management-import-leads-activities?hsLang=en)
To update *Associated Contacts'* data via a .csv import, use the *Associated Contact’s* primary phone number in the primary\_phone\_number column, and the contact will be updated in the same way that primary contacts are updated. If you have entered a Rep’s email address that’s associated with an Sellfire Rep Edition in the owned column of the import, the ownership of the entire lead will change based on that update.
- [Getting Started](https://support.sellfire.com/getting-started?hsLang=en)
- [Rep Guide](https://support.sellfire.com/rep-guide?hsLang=en)
- [Leads](https://support.sellfire.com/leads?hsLang=en)
- [Enablement Configurations](https://support.sellfire.com/enablement-configurations?hsLang=en)
- [Integrations and Plug-ins](https://support.sellfire.com/integrations-and-plug-ins?hsLang=en)
[](https://www.Sellfire.com)
© 2026 Sellfire. All Rights Reserved.
Support Hours
Mon-Fri 9:00 AM-5:00 PM CT
Excluding US federal holidays