Rep onboarding quick start guide
Device and network requirements and recommendations
Click here to reference the network requirements, recommendations, & troubleshooting article.
Create a password
When your Rep Edition was created, you should have received a welcome email to set up your password. If you cannot find that email, you can click Forgot password? in the Sellfire login page and use the email address that is associated with your Sellfire Edition as the recovery email address. Once submitted, an email will be sent for you to set up your password.
Login to Sellfire
Click here to access the login page.
Note: To ensure optimal performance, only use Sellfire with the Google Chrome browser, and ensure Google Chrome is up-to-date.
Refresh your browser frequently
To ensure you are seeing the most up-to-date features, it's important that you refresh your browser frequently. We recommend once daily at the beginning of your day.
Upload a profile image
This image appears in dashboard reporting, to other Reps when they are transferring you demos, and to prospects when they are connecting via the Inbound Concierge website widget.
-
- Navigate to Account Settings by clicking on the placeholder image
 at the top of the left navigation bar.
 - Click Edit Profile Image under the placeholder image.
- Select and crop your image.
- Navigate to Account Settings by clicking on the placeholder image
Sync your Google or Outlook calendar*
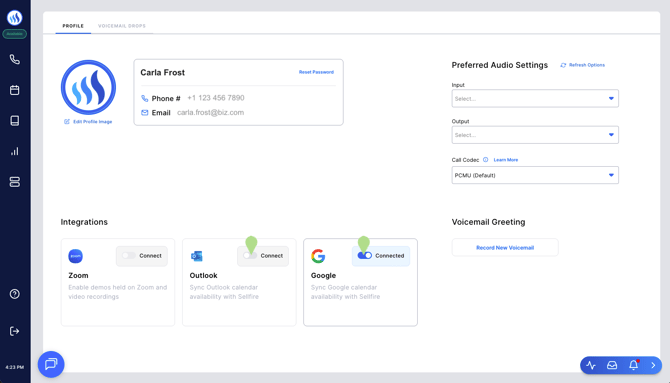
In order to send calendar event invites from Sellfire, the Google or Outlook calendar that you use for your organization needs to be synced. This sync pushes Sellfire events to your synced calendar, pulls in time blocks for meetings that you scheduled in that calendar into your Sellfire calendar, and recognizes events on your Google/Outlook calendar when determining your availability in Sellfire.
Without this sync enabled, events scheduled in Sellfire will still appear in your Sellfire calendar.
In Account Settings, accessed by clicking on the profile picture at the top of the left navigation bar, navigate to the Integrations section and click Connect.

Note that to ensure the calendar sync functions as expected, the email address associated with your Sellfire Rep Edition cannot include any symbols or special characters (+, &, $, etc.). If the email address associated with your Sellfire Edition needs to be changed, please reach out to our Support team (support@Sellfire.com).
* If you are using an Sellfire sandbox test account, do not connect to your calendar via that Sellfire sandbox account. Only connect to your calendar via your production account that you will use to take actions on real leads.
Record a voicemail greeting
In Account Settings, navigate to the Voicemail Greeting section and click Record New Voicemail.
Record voicemail drops
In Account Settings, navigate to the Voicemail Drops tab to record messages that you can drop when you encounter voicemail boxes. Click here to learn more.
Install the Sellfire Google Chrome extension for self-sourcing leads
Click here to learn more.
Download and install the mobile app
If an Enablement user in your organization has toggled on the ability for you to access your Sellfire Rep Edition via the mobile app in System Configuration > Your Organization > Sales Teams, click here to learn more.
Dialer, current call screen, and Lead Detail pages
Click here for an overview of the Dialer, current call screen, and Lead Detail pages.
Preparing to contact prospects
Automated and manual lead assignment, claiming, and self-sourcing
You can receive leads automatically from configurations made by Enablement users in your organization, manually from other users in your organization, by claiming existing leads, and/or by self-sourcing new leads.
Click here to reference the lead assignment, claiming, & ownership article.
Lead Card
Quickly access important lead data and history. Click here to learn more about the Lead Card.
Lead queue & pipeline management
Click here to reference the lead queues & management article.
Contacting prospects
Click here to reference the communicating with prospects article.
Call results & scheduling events
Click here to reference the call results article.
